In the world of Front-end developers, “Reactivity” is something that everybody uses, but very few people understand. It’s no one’s fault, really, as several people have different definitions of reactivity in programming. So before starting off, let me just give you a definition in terms of Front-end frameworks.
“Reactivity, among JavaScript frameworks, is the phenomenon in which changes in the application state are automatically reflected in the DOM.”

Reactivity in Vue.js is something that comes with the package.
Here is an example of reactivity in Vue.js, with two-way binding (using v-model) ,
In the above example, you can clearly see that the change in the data model layer,
    new Vue({
      el: "#app",
      data: {
        message: ""
      },
    })
is automatically reflected in the view layer,
    <div id="app">
      <h1>Enter your message in the box</h1>
      <p>{{ message }}</p><br>
      <input placeholder="Enter message" v-model="message" />
    </div>
If you are familiar with Vue.js, then you might be used to this. But, you must remember that things don’t work the same way in vanilla JS. Let me explain it with an example. Here, I have recreated the above Vue.js reactivity example in vanilla JS.
You can see that JavaScript is not naturally reactive here, because when you enter the message, you don’t see the message automatically getting re-rendered in the HTML view. Why is it so? What is it that Vue.js does?
Well, to get an answer to that, we will have to understand its underlying reactivity system. Once, we have a clear understanding, we will try recreating our own reactivity system in vanilla JavaScript, which will be similar to the Vue.js reactivity system.

Let me break it down for you, from the beginning,
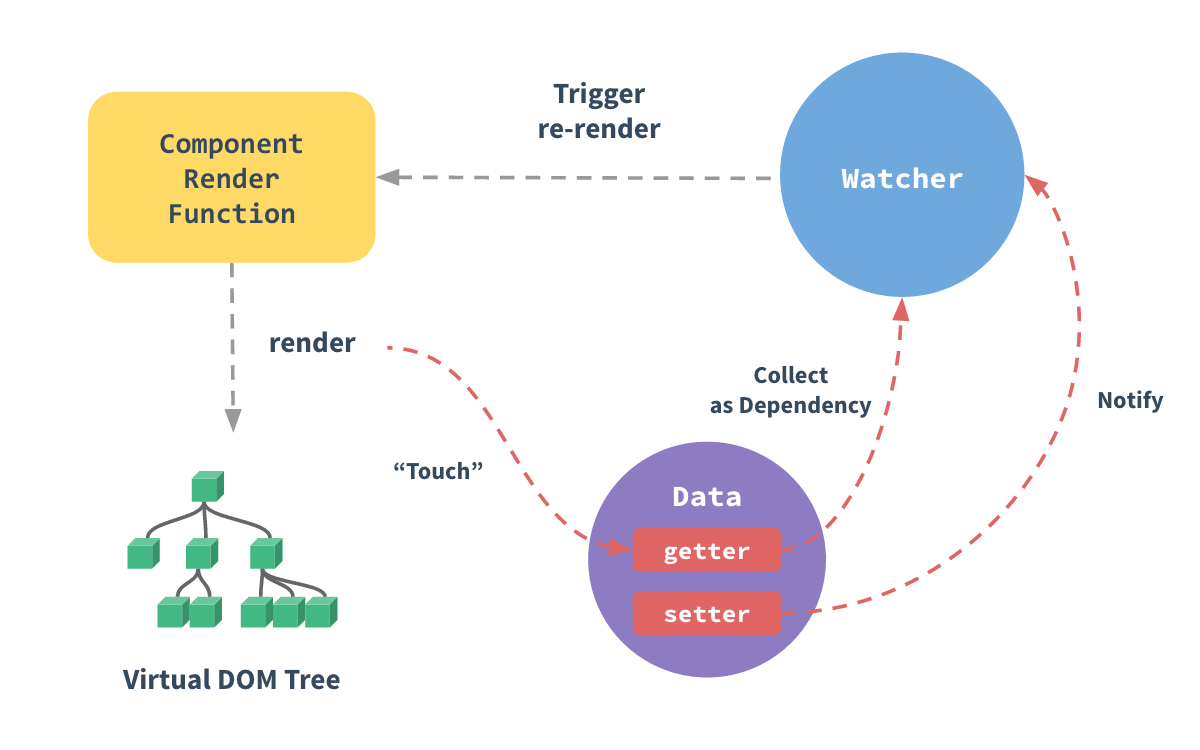
On the first render, if a data property is “touched” (accessing a data property is mentioned as “touching” that property), its getter function is called.
Getter: The getter function calls the watcher with an intent to collect this data property as a dependency.
(If a data property is a dependency, then it means that some target code/function will run, everytime the value of this property changes.)
Whenever a watcher is called, it adds that data property as a dependency from whose getter it was called. The watcher is also responsible for calling the component render function.
In reality, Vue’s component render function is not that simple, but for the sake of understanding, we just need to know that it returns the Virtual DOM Tree with the updated data properties, which gets displayed in the view.
This is the part, which is basically the core of reactivity in Vue.js. So, when we make a change in a data property (which was collected as a dependency), its setter function is called.
Setter: The setter function notifies the watcher on every change in the data property. The watcher, as we already know runs the component render function. Hence, the change made in the data property gets displayed in the view.
I hope that the workflow is clear to you by now because we will be recreating this reactivity system in vanilla JavaScript.
Now, that we are recreating the reactivity system, the best approach would be to understand its building blocks (in code), one-by-one, and in the end we can assemble all of it,
Task: First of all, we need a data model.
Solution:
What kind of data do we need? Since we are recreating the Vue example that we saw earlier, we will need a data model exactly like it.
    let data = {
    	message: ""
    }
Task: We need to have a target function that will be run once there is a change in data model.
Solution:
The simplest way of explaining what a target function is this,
“Hi, I am a data property message and I have a target function renderFunction(). My target function runs whenever my value changes.
PS: I can have more than one target functions, and not just the renderFunction()“
Thus, let’s declare a global variable named target which will help us record a target function for every all the data properties.
let target = null
Task: We need a way to collect data property as a dependency.
By now, we only have the data and the concept of target functions, which runs when the value of the data changes. But, we need a way to record target functions for each and every data property separately, so that when there is a change in a data property, then only those target functions will run which were stored separately for that data property.
Solution:
We need to have a separate storage space for each data property’s target functions.
Suppose we had the following data,
    let data = {
    	x: '',
    	y: ''
    }
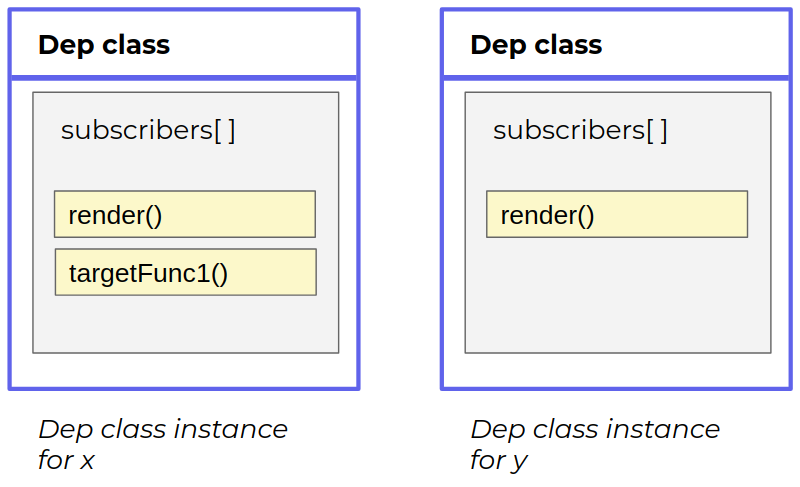
Then, we want to have two separate storage for x and y. So, why not just define a Dependency class and each data property can have its unique instance?
That can be done by defining a Dependency class so that each data property can have its own instance of the Dependency class. Hence, each data property can be allotted its own storage space for target functions.
    class Dep {
    	constructor() {
      	this.subscribers = []
      }
    }
Dependency class has subscribers array which will act as a storage for target functions.

Now, we need two more things to make the Dependency class fully complete,
depend(): This function pushes target functions into the subscribers array.notify(): This function runs all the target functions stored in the subscribers array. class Dep {
constructor() {
this.subscribers = []
}
depend() {
// Saves target function into subscribers array
if (target && !this.subscribers.includes(target)) {
this.subscribers.push(target);
}
}
notify() {
// Replays target functions saved in the subscribers array
this.subscribers.forEach(sub => sub());
}
}
Task: We need to find a way to automatically run the target functions of a data property whenever there is a change in that property.
Solution:
By now we have,
Next thing that we need is,
depend() when a data property is “touched”.notify().To implement this, we will be using getters and setters. Object.defineProperty() allows us to add getters and setters for any data property like this,
    Object.defineProperty(data, "message", {
    	get() {
      	console.log("This is getter of data.message")
      },
      set(newVal) {
      	console.log("This is setter of data.message")
      }
    })
So, we will be defining getters and setters for all the data properties that are available like this,
    Object.keys(data).forEach(key => {
    	let internalValue = data[key]

      // Each property gets a dependency instance
      const dep = new Dep()

      Object.defineProperty(data, key, {
      	get() {
        	console.log(`Getting value, ${internalValue}`)
        	dep.depend() // Saves the target function into the subscribers array
          return internalValue
        },
        set(newVal) {
        	console.log(`Setting the internalValue to ${newVal}`)
        	internalValue = newVal
          dep.notify() // Reruns saved target functions in the subscribers array
        }
      })
    })
Also, you can see above that dep.depend() is being called in the getter because when a data property is “touched”, its getter function is called.
We have dep.notify() inside the setter because the setter function is called when there is a change in that data property’s value.
Task: We need a way to encapsulate the code (target functions) that has to run when a data property’s value changes.
Solution:
By now, we have created a system in which data properties are added as dependencies right when they are “touched” and if there is any change in that data property, all its target functions will be executed.
But, there is something that is still lacking, we have not initialized the process with any code for the target functions, yet. So, for encapsulating target functions’ code and then initializing the process, we will be using watchers.
A watcher is a function which takes another function as a parameter, and then does the three following things,
target variable with the anonymous function that it gets in the parameter.target(). (Doing this initializes the process.)target = null let watcher = function(func){
// Here, a watcher is a function that encapsulates the code
// that needs to recorded/watched.
target = func // Then it assigns the function to target
target() // Run the target function
target = null // Reset target to null
}
Now, if we pass a function into the watcher and then run it, the reactivity system will be complete and the process will get initialized,
    let renderFunction = () => {
    	// Function that renders HTML code.
    	document.getElementById("message").innerHTML = data.message;
    }

    watcher(renderFunction);
Now assembling all of the above code, we have successfully recreated the Vue.js reactivity system in vanilla JavaScript. Here is the implementation of the first example that I showed you, using this reactivity system,